
Design isn’t about making something pretty, although that’s part of it. Design is largely about function. It’s about making an interface work so well that the user never stumbles. Much of a good UI depends on a notion called visual hierarchy.
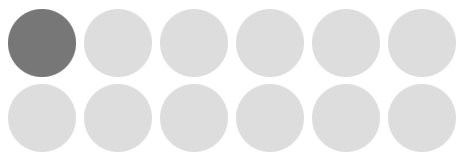
Visual hierarchy, while it may sound technical, is really a pretty simple concept. By using color, contrast, texture, shape, position, orientation, and size, one can organize elements on a page so that users gets a sense of visual importance. For example, look at this graphic:

Where did your eyes go? Maybe to the first circle, since we naturally read from left to write. Or maybe somewhere in the middle. The point is, nothing guided your eyes because all of the circles are the same.
If you make everything bold, nothing is bold.
Let’s make a slight change to that graphic:
Now where did your eyes go? My guess is the first circle. With only shading, I was able to direct your eye to the circle that, for whatever reason, I believed to be the most important. This is visual hierarchy.
But we as designers don’t draw pictures of circles. Let’s talk about visual hierarchy in web design and show some real-world examples.
Note: when examining visual hierarchy, I prefer to use the squint technique (literally, I squint my eyes until the page becomes out of focus and blurred). Since I can’t blur your eyes for you, I’ll blur the screenshots instead. There’s no reason we need to see every pixel when organizing a page; in fact, the details get in the way at this stage.
A Poor Example
Ahh the Drudge Report. Much to my surprise, there are legitimate, successful designers who would argue that the Drudge Report is a well-designed site since it has “stood the test of time” (lame reasoning if you ask me). Needless to say, I’m not in that camp.
Using the Drudge Report as the guinea pig, let’s look at a poor example of visual hierarchy:
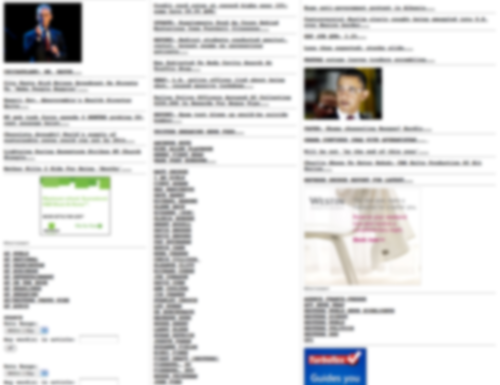
The screenshot above has 2 supporting graphics, 3 advertisements, 2 search/date filter forms, several sections, and a number of links that have different meanings. Breaking this down, the identifiable problems:
- At a glance, you can’t tell the difference between the advertisements and the supporting article graphics.
- There’s no easy way to detect where the search/date filter forms are located (hint: lower left corner).
- All of the links (and sections) have the exact same treatment, but they don’t all have the exact same purpose (news articles, columnists, and content feeds).
Overall this site does a poor job of guiding the user through visual importance. Now let’s look at something I recently worked on.
A Better Example
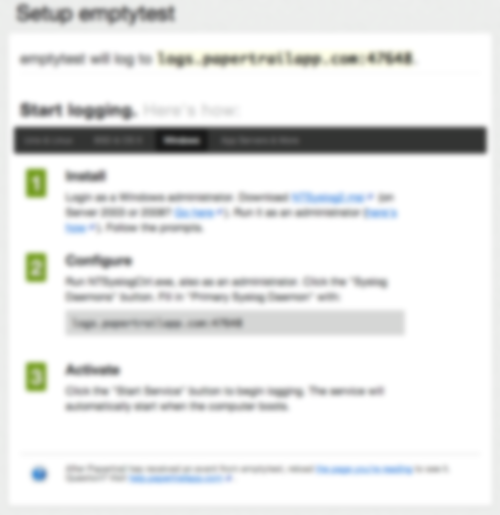
The situation: in an app I’m working on there is a bit of setup required before the user can dive into the core of what the app does. Since setup instructions are generally a barrier-to-entry, the goal was to make it as easy as possible for the user to get in and out, knowing the exact steps they needed to take.
First, I’ll show where I started: the screen with very little attempt to organize the page. Then I’ll show how I used visual hierarchy and the difference that it made. Here’s the undressed version:
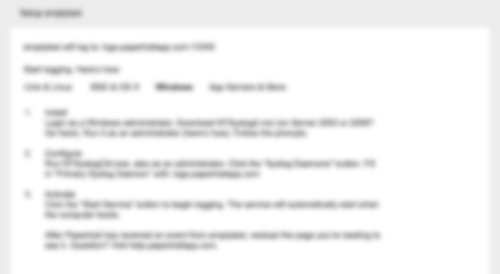
So what’s most important? I bet you don’t really know. Everything seems to be the same. You can see that there is a list, but it doesn’t really indicate that these are steps the user needs to take. It could be a grocery list for all we know (albeit, a wordy one).
Without introducing any color (yet), here’s the same page and content, only this time with an attempt to guide the user using different levels of visual importance:
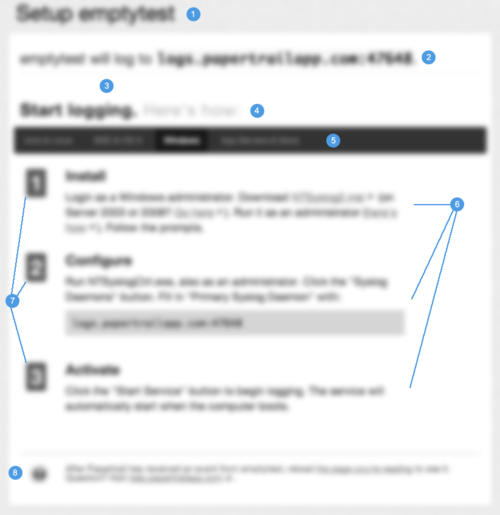
Let’s go through the changes. The numbers on the graphic correspond to the numbers in the list below.
- Increased header size to be clear about the item being setup. It should be crystal clear as to what exactly is being setup.
- This line needs to speak to the user before anything else, because for experienced users, it could potentially remove the need for the setup instructions altogether. So I increased the font a bit and separated it from the content below using a border-bottom (look closely).
- Using nothing but space, I was able to disconnect the upper and lower content sections even more, essentially saying “Read This First”.
- This title sets up the purpose of the content below it, so I bumped up the font size and made it bold. Subtext next to it isn’t quite as important, so it’s dimmed a bit (but by drawing attention to the main text, the right text is inherently read, but without the additional noise).
- This is a menu of options where each option contains its own set of instructions–it’s incredibly important that the user knows which option they’re on, but above that it’s to illustrate that their are options. Also, this menu was to act as a header to ground the instruction set below it.
- Each “step” has a title and a instruction. By bumping up the section title I’ve essentially scoped what the content below it is explaining. It’s important that the user could scan the list just to get an idea of what was involved, then dive into the details. The instruction paragraph was also given more space above/below and increased line-height to help with readability.
- These numbers should feel more like “steps” than a list. By squaring them up, increasing the size, and giving some visual depth (contrast), I was able to achieve that. This no longer feels like a wordy grocery list.
- The support help/text is important, but it should not get equal attention as the instructions themselves. So by moving it down the page, decreasing the size/line-height, and softening the color, I am basically saying “this is here if you want it, but it’s not quite as important as the rest”. In the rare case that a user needs more help, he/she will be explicitly scanning the page for help information, so it’s less of a concern to make it stand out–it will undoubtedly be found if need be.
When positioning elements on a page I like to work in gray tones first, like the screenshot above. You can do a lot with just contrast and sometimes colors get in the way early on. However, once you achieve a solid foundation on position and weight, color can take the visual importance even further. Take a look at the same screenshot, but in color:
The end result is much better than where I started. It’s now (hopefully) clear to the user that they have a step-by-step process to go through, and (hopefully) each step is clearly defined and explained.
Conclusion
Visual hierarchy is just another tool in the tool-belt, but I believe it’s among the most important. If nothing else, hopefully this helps other designers by at least reminding them to start with the function and flow before the fancy graphics. Nail down the purpose of each page element, and then dress it up.
Happy designing!