Thoughts on Engineering, Photography, and Design.

Hey, I'm Ryan Heath. I design & develop things and play with cameras for fun. This is where I share my thoughts on all of that — and probably more — along the way.

Infrared Sensor Conversion

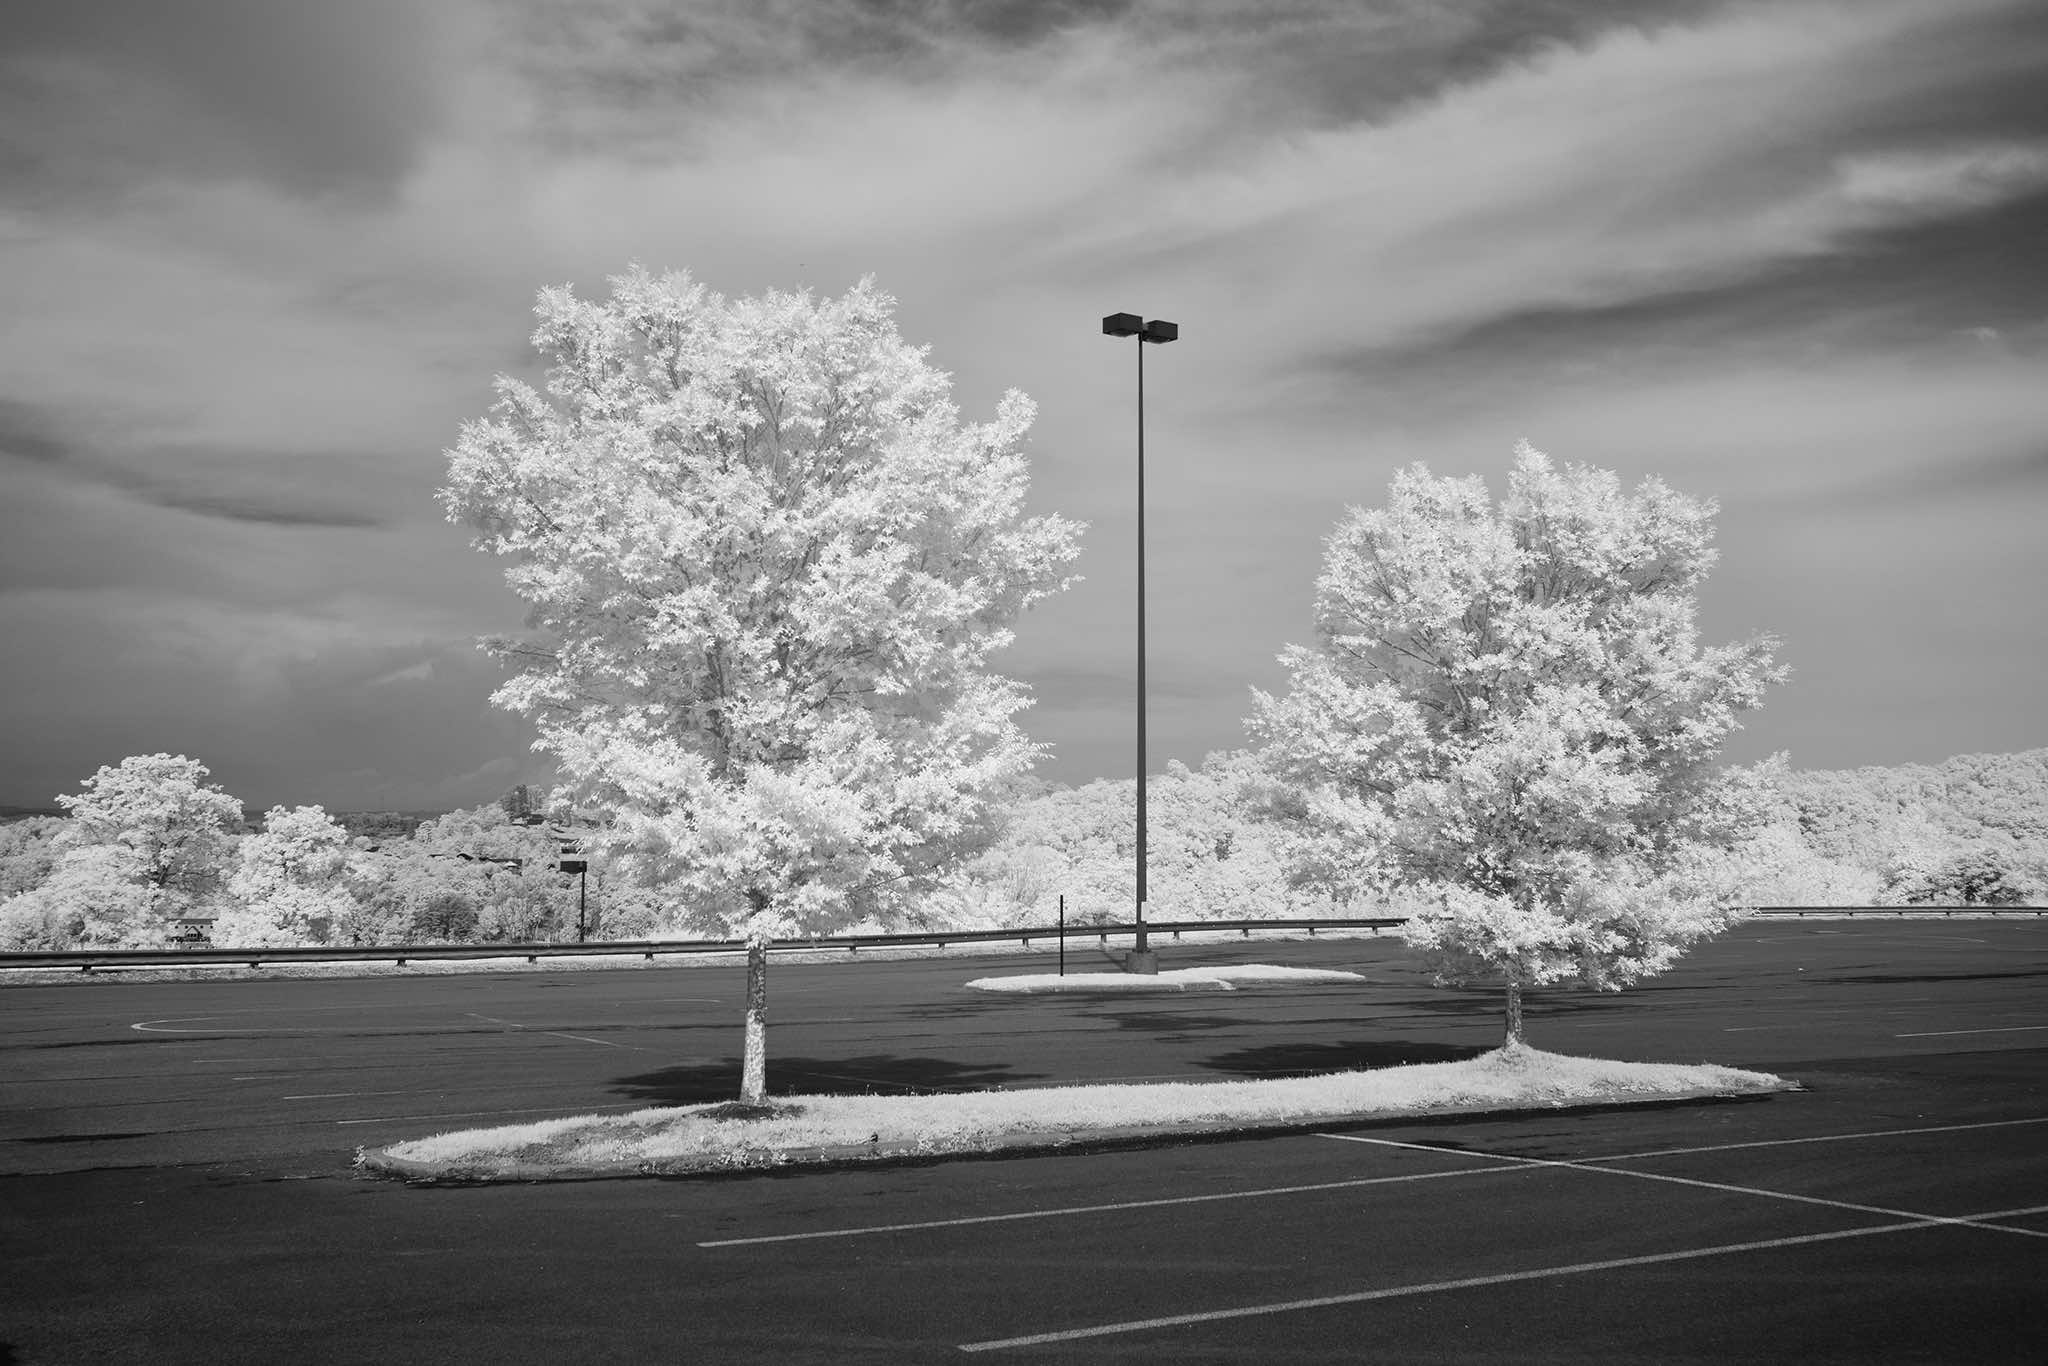
I recently had the sensor in my old Fujifilm X-T3 converted to infrared (720nm). I used Kolari Vision for this, which involved sending the camera off for a few weeks. The result is exactly what I had hoped for!

The cheaper alternative is to use lens filters to do this on top of a normal sensor, but they knock out 6-10 stops of light, which means you can forget hand-held shooting. Everything must be stood up on a tripod, which is fine, but kind of limiting. So I opted for the full, permanent conversion.

Infrared Parking Lot

It’s been a blast so far! Seeing the world through infrared opens up a ton of new photographic opportunities. It’s tough dedicating a camera to this permanently, but since that affords me normal shutter speeds and accurate autofocus, I have no regrets.

Oh, and a bonus: infrared photography works best in mid-day, blue sky, full sun situations (which is otherwise a photographer’s nightmare). So now I’m able to shoot 24/7, no excuses!

The Proactive Engineer

I’ve been a young engineer, mentored young engineers, and now I manage (some) young engineers. One of the best perspectives a young engineer—or any engineer—can have is being proactive.

Engineering is complicated. There are often multiple teams and departments coinciding with ever-changing requirements. This can provide engineers with a tempting out (or “pause button”) when working on a problem because they feel blocked on some level. Does something like this sound familiar?

We can’t work on that yet because there’s no API.

Quite often, though, there’s more an engineer can do than claiming blockers. With minimal additional effort, let’s see how much more helpful a response like this might be:

We can’t work on that yet because there’s no API. But I spent some time thinking about what inputs and outputs we would need to properly build X feature, and wrote up my notes as a proposal for the backend team’s consideration.

Makes a difference, right?

It’s easy to throw things over the fence. It takes intentional effort to avoid it. But when you do, that proactive mindset can go a long way within a team and helps nurture a problem solving culture. It’s not about you, me, or them. It’s about solving a problem and helping everyone involved come up with the best outcome for the situation.

We all want to work with helpful, caring individuals… a proactive brain can help convey that to others.

How to continue making kerosene lamps on the eve of electricity

I don’t think I fully believed in AI building software until fooling around with ChatGPT. Maybe it won’t affect software development like it feels like it might, but I don’t think it can be ignored any longer.

I like to imagine that all of us in software development, as it looks today, are busy making beautiful kerosene lamps in all shapes and sizes. We’re improving the burn efficiency. We’re finding ever clearer forms of glass to let the light through. We’re tinkering with a formula that’s been around for a long time. But as we do, Edison and Tesla are busy inventing electricity in the other room.

Setting Ownership in Rails

There’s a common pattern in a lot of applications to track who did what. Who created this post? Who was the last person to update it? Maybe it’s for accountability, maybe it’s because your client is nosy.

There are gems for this, but it’s such a simple thing, that extra dependency isn’t really worth it. So let’s take a look at a pretty simple way to achieve this in Rails 7 using a concern:

 1module Ownership
 2  extend ActiveSupport::Concern
 3
 4  included do
 5    before_validation :set_ownership
 6
 7    scope :created_by, ->(user_id) {
 8      where(creator_id: user_id)
 9    }
10    scope :updated_by, ->(user_id) {
11      where(updater_id: user_id)
12    }
13
14    belongs_to :creator, class_name: 'User',
15      foreign_key: 'creator_id', optional: true
16    belongs_to :updater, class_name: 'User',
17      foreign_key: 'updater_id'
18
19    validates :creator_id, :updater_id,
20      presence: true
21  end
22
23  private
24
25  def set_ownership
26    current_user = Current.user
27
28    if new_record?
29      self.creator_id = current_user.id
30      self.updater_id = current_user.id
31    else
32      self.updater_id = current_user.id
33    end
34  end
35end

Now, for any model that has creator_id and updater_id columns, you just have to include the Ownership module:

 1class Post < ApplicationRecord
 2  include Ownership
 3
 4  # ...
 5end
 6
 7>> @post = Post.find(1)
 8>> @post.creator
 9# => #<User id: 10 ... >
10>> @post.updater
11# => #<User id: 20 ... >

And whenever a Post is created, the creator is automagically set; similarly, whenever any Post is updated, the updater is automagically set. This, of course, assumes your application has user sessions, since you obviously need to know who’s logged in doing the creating and updating.

Cinebloom Diffusion Filters by Moment

I’ve had a cinebloom diffusion filter (10%) on my X100V for about a year now. If you’re not sure what a diffusion filter does, Moment’s site says it best:

The CineBloom Diffusion Filter takes the edge off your digital sensor. It not only catches and blooms light, but softens hard edges and has a smoothing effect on skin tones, making wrinkles less noticeable. Escape the clinical, ultra-sharp look of digital with this specialty glass.

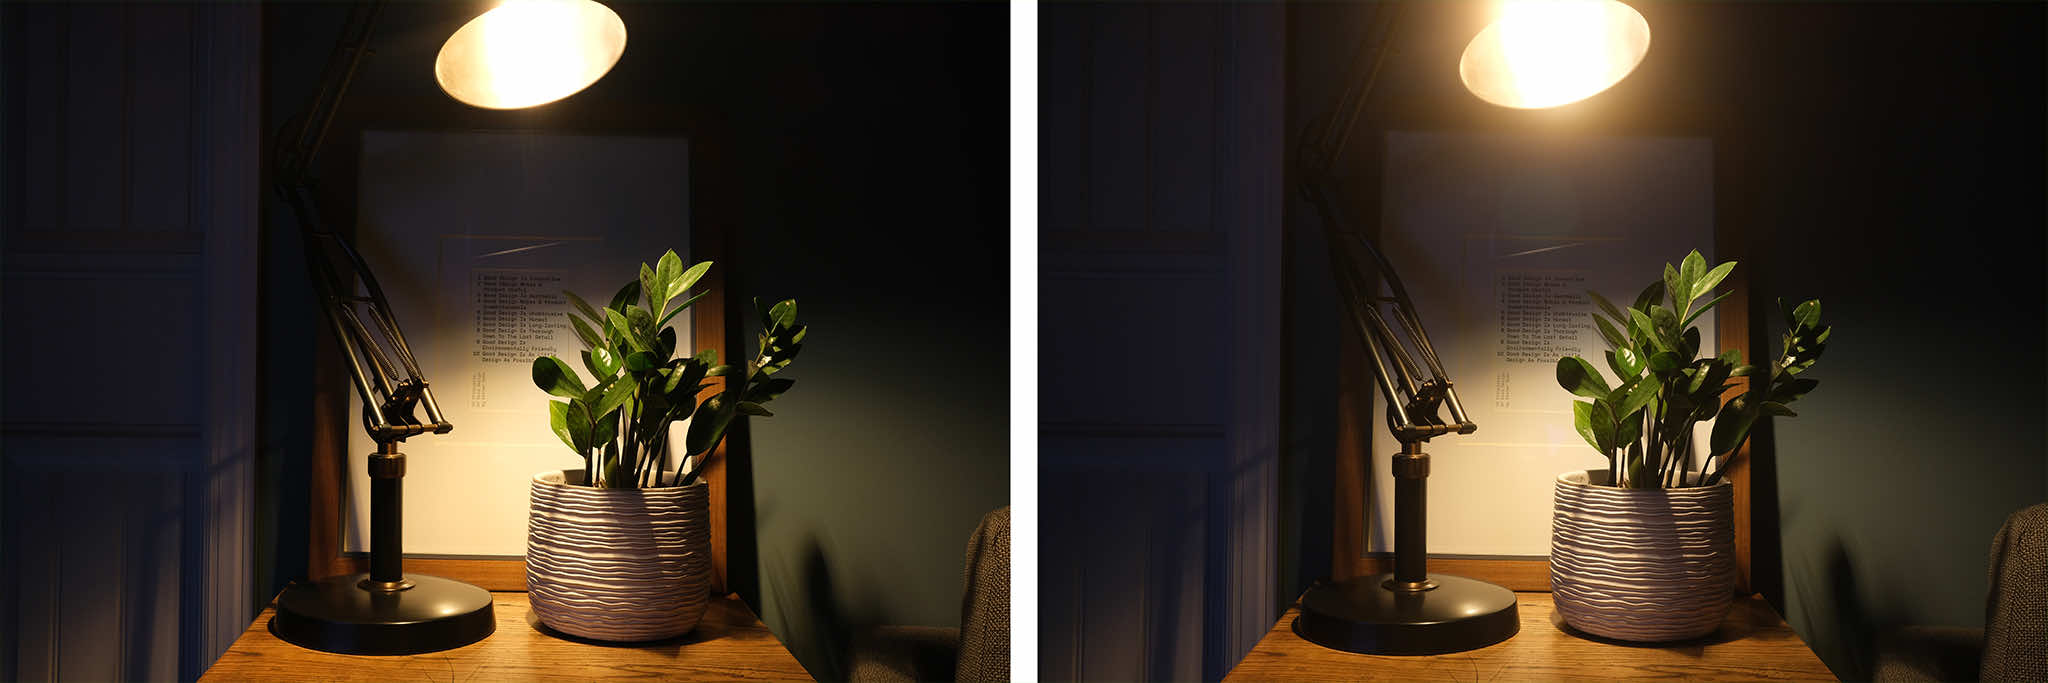
While I’m someone who thrives on sharp images, for the 10% filter at least, I haven’t noticed a sacrifice in sharpness. Here’s a sample with (right) and without (left) this filter:

Comparison

It’s subtle, but it’s there.

This filter pairs really well with the output of the X100V, straight out of camera. Here’s another photo looking straight into the sun while my dog, Penny, is racing back and forth between my wife and I.

Penny

Again, the X100 series already produces stunning photos… but if you’re itching to mix it up a little bit, a cinebloom filter might be just the thing.

Compositions Using ViewCatcher

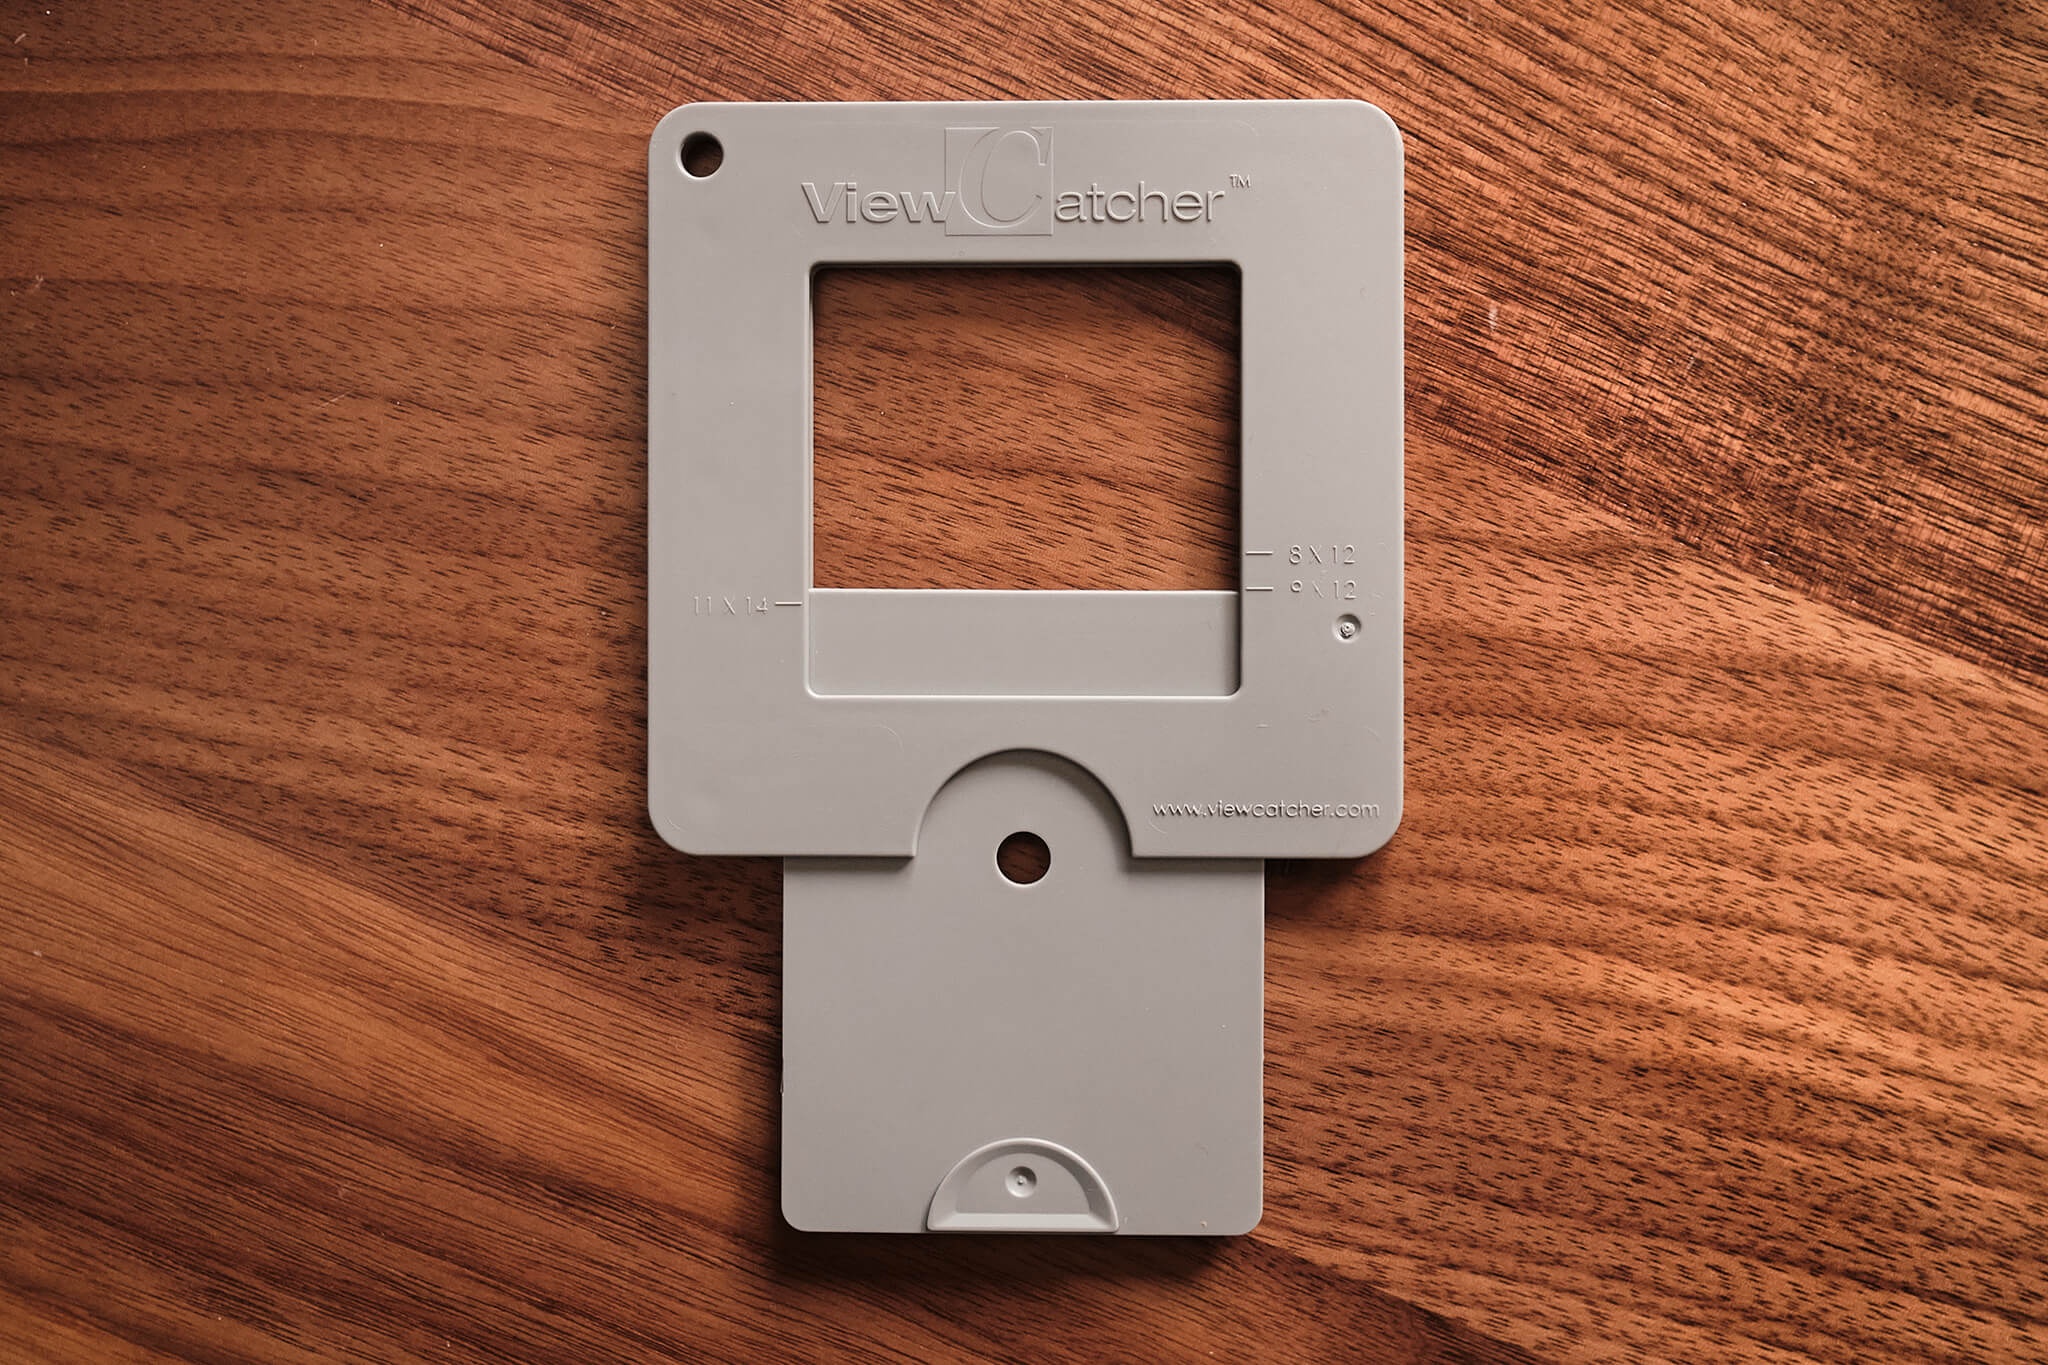
The ViewCatcher is a tiny little tool that is really useful for determining compositions when out in the field. It’s a plastic “card” that slides open to represent the view your camera would see. Here’s what it looks like:

The ViewCatcher

This thing may seem silly at first. But if you’re a photographer who walks around searching for compositions, I’m sure you’ve done one of the following two things:

  1. Stop to set up your tripod and mount your camera, only to find yourself continuing to move all over the area with your tripod fully extended searching for the best composition.
  2. You keep your camera out in your hand instead of your bag, repeatedly holding it to your eye to see if there’s a photograph to be made.

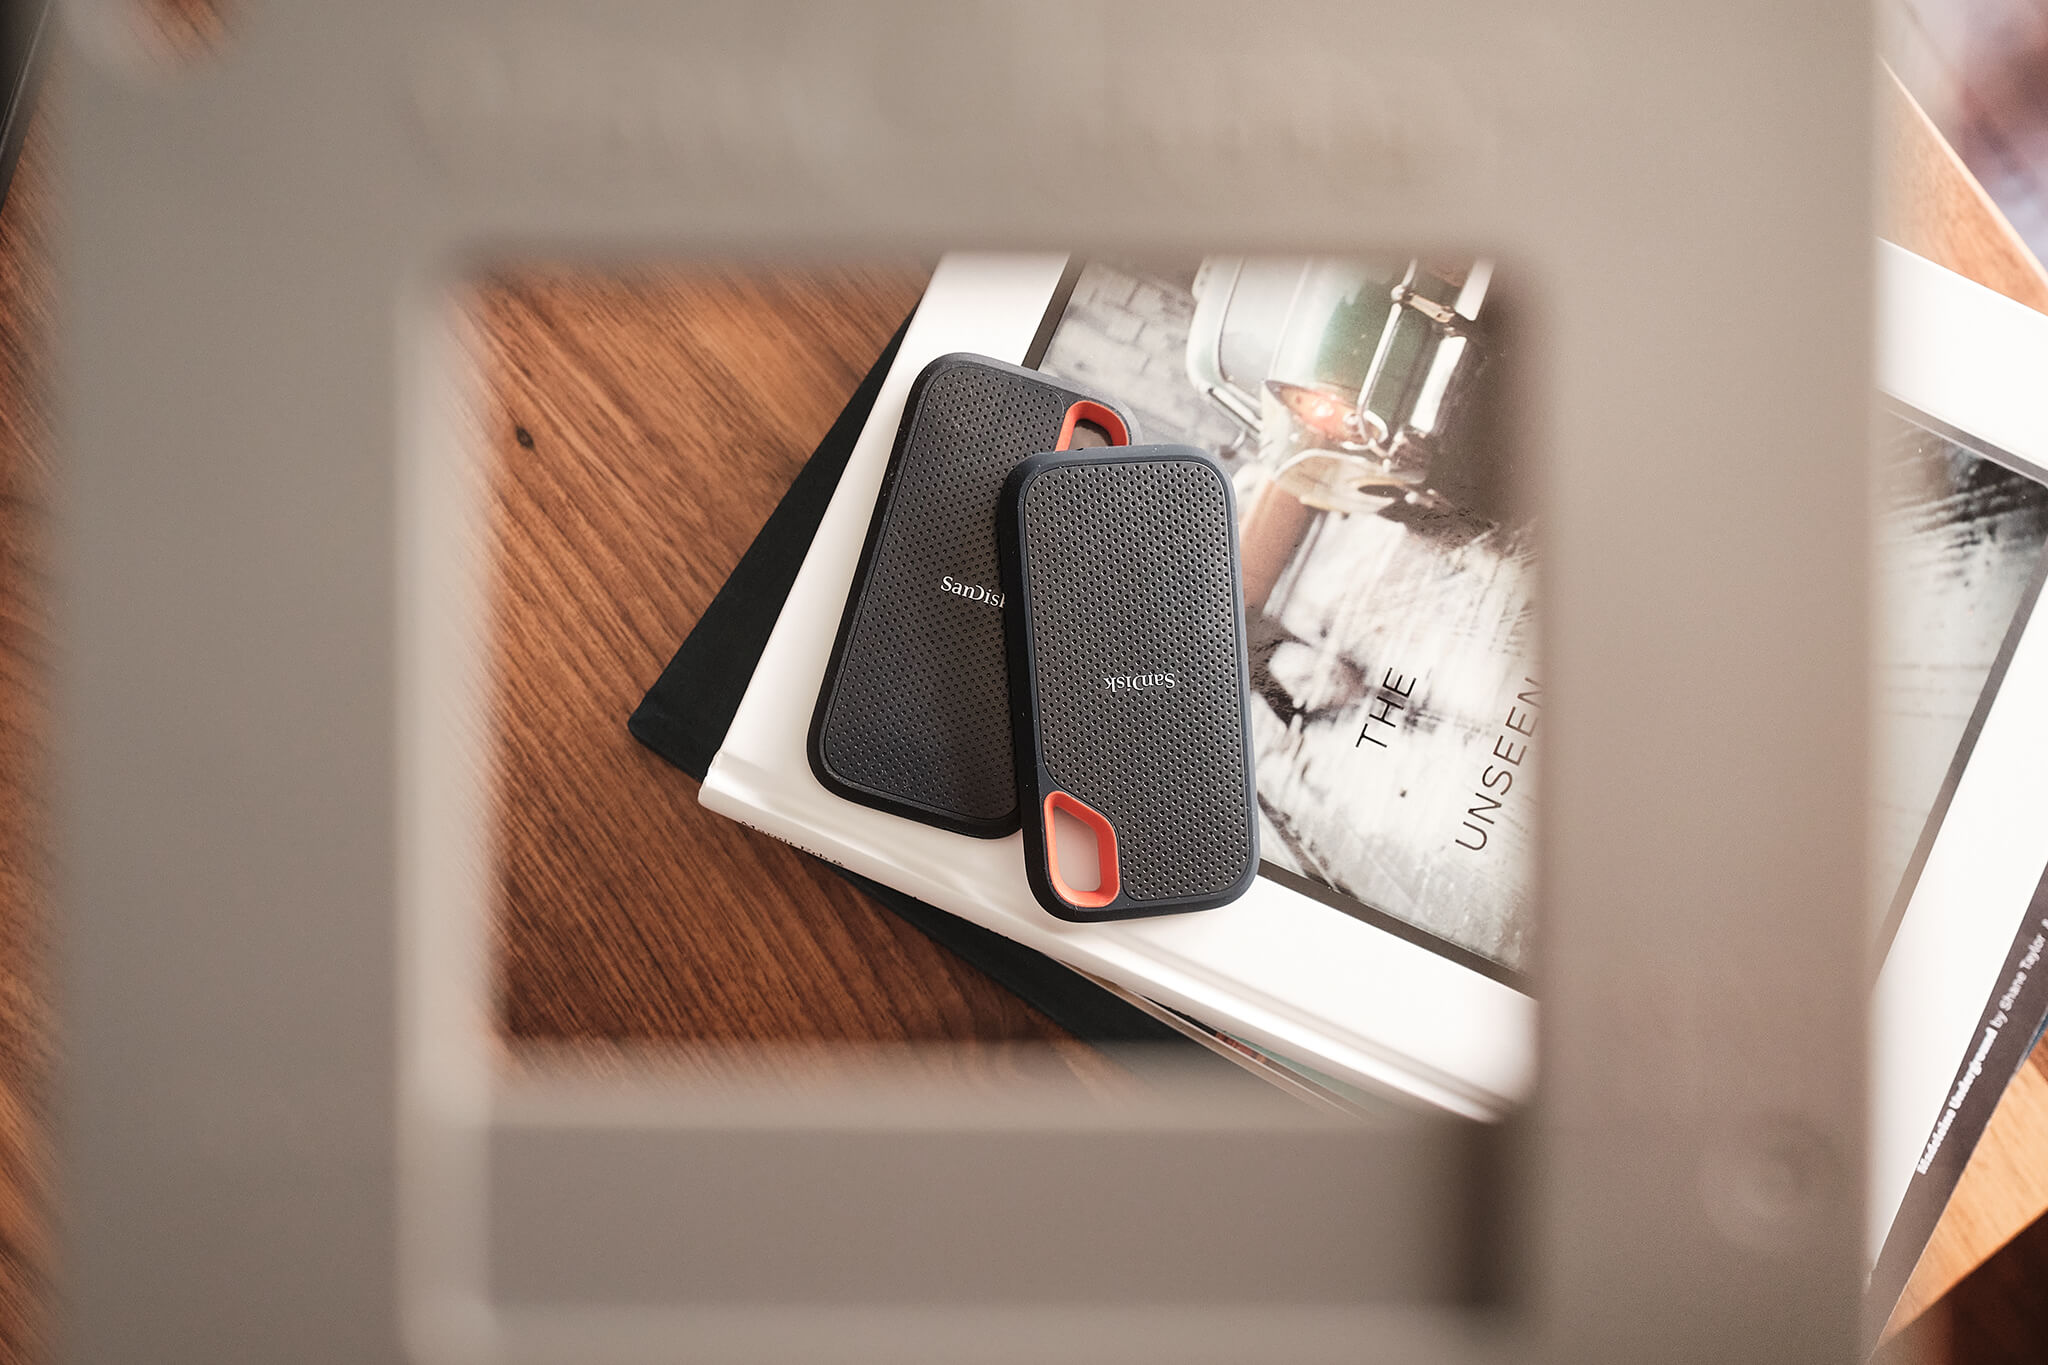
Both of those approaches are fine. But they drain battery, take time, expose your gear more, and can be annoying to deal with. With this little card, you can pull it out of your pocket as needed and focus your eye on a potential scene.

The ViewCatcher Example

If you’ve seen an old film director make a square with his hands and close one eye to look through it, this is that very concept. By filtering out the noise you can make better compositional decisions.

There are multiple popular aspect ratios supported (it has little marks indicating how far to slide it open):

  • 8x10
  • 8x12
  • 9x12
  • 11x14
  • 12x16

It’s quite handy!

Putting the Kibosh on UI vs UX

This is something I’ve argued at length throughout my career, and the last paragraph sums my feelings up nicely:

Users win when we prioritize building exceptional experiences that look great and function great; that solve real problems with finesse, grace, and delight. The more we fracture all this, the more we fall short of exceptional.

Glass: An Incredible Photo App

Glass is a stunning application built for photographers. As soon as I found it, I knew it was what I’d been looking for. There are only a couple of brand new, subscription-based services that I’ve immediately signed up with, but Glass was one of them. Zero hesitation, zero regrets.

And as someone who’s into product development (if you care about that sort of thing), I can confirm for you that it has a brilliant design with an even better UX. It’s a pleasure to use and is currently my favorite app. Oh, and it’s pretty great in a browser, too.

Aside from it being a fantastic application on its own merit, the people behind it seem just as fantastic. I really love their creativity, ideas, blog posts, approach to feedback, and even their Twitter account — I’m happy to support them.

Since Instagram is no longer a good place for photographers these days (as it’s all about video, stories, and “the algorithm”), it’s a wonderful time to try something new. There are lots of alternatives out there, but for me, the clear winner is Glass, hands down.

Highly recommended.

File Organization for Photographers

When you do a thing that produces a ton of files, requiring some level of organization and backup, you need a plan. For me, it’s photography. I’ve been through many variations of file storage, but I think I’ve cracked it. When I got serious about photography, trying to find out what fellow photographers did wasn’t as easy as you might think, so I’m writing this post for the Google index, in case you’re also wondering.

Conventions

Before getting into the details, here are the conventions that I use. To start, I keep everyting in a Photography folder and utilize two top-level folders inside of that:

  • Captures — This is where all photos land off the SD card (deselects) before culling.
  • Photos — This is where all keeper photos (selects) are moved to for eventual post-processing.

I’m also assuming that you shoot in RAW and plan to post-process your photos in some fashion. The base file structure for both Captures and Photos looks like this:

 1Captures
 2  [YEAR]
 3    [MONTH].[DAY]
 4      [CAMERA]
 5
 6Photos
 7  [YEAR]
 8    [MONTH].[DAY]
 9      [CAMERA]
  • The [YEAR] is in four-digit format, and the [MONTH].[DAY] should always be in two-digit format (so 01.08 for January 8th, instead of 1.8).
  • The [CAMERA] is optional, but if you shoot with multiple cameras, or suspect you might at some point, I recommend getting in this habit. Putting the [CAMERA] folder inside of the [MONTH].[DAY] folder ensures that you can continue to browse photos by date (independent of the camera that made them).

Here’s an real example taken from my MacBook:

Photo Organization

Personal or Professional?

There are differing levels of “serious” here. If it’s a hobby, you need organization and some type of passive backup (optional). If it’s a career, and you have clients, you need organization and some type of aggressive backup (required).

I’ll break down some ideas for both.

Personal Workflow

STEP 1: Create the necessary [MONTH].[DAY] folders in the Captures and Photos directories.

STEP 2: Under each of the [MONTH].[DAY] folders, create a sub-folder for the camera that made the photos.

STEP 3: Insert your SD card and copy all of the files to the Captures folder, ensuring that they’re organized by date and camera per the first two steps above.

STEP 4: Culling! This means going through all of your captured photos and choosing the selects that you want to post-process. For this, I use Photo Mechanic. It’s the fastest media browser for large RAW files I’ve ever used. I’m sure there are others, but that’s a good one.

From here, I go through the photos and flag the ones I want to keep with a 1 Star rating. I mapped a keyboard shortcut to the number 1 key, which helps speed things up. Also, the z key zooms in/out which helps you verify focus.

STEP 5: Once you’re finished culling, you need to move the selects to the Photos directory, following the same date and camera sub-folder organization applied to the Captures folder.

I do this inside of Photo Mechanic. Once I have all of my selects flagged with a 1 Star rating, I filter the list to hide 0 star photos which leaves me with all of the photos I want to post-process. From here, I select all and drag them to their proper home in the Photos directory.

STEP 6: Importing! I use Capture One Pro as my post-processing app of choice. I spent years in Lightroom Classic, and while it’s a great app, it doesn’t process X-Trans (Fujifilm) RAW files as good as Capture One.

This part may vary, depending on which application you use, but the idea here is to import all of the selects from the Photos folder. Remember, you never import from the Captures folder. Oh, and for Capture One users: I prefer the “Add to Catalog” option so that it keeps the file system and my organization intact.

STEP 7: Exporting! I no longer export my edits unless I’m doing something with them (printing, making a book, sharing on social media, etc).

That said, if you like or need to export, I recommend creating an Exports folder inside of your [MONTH].[DAY] folder. For exports, I don’t think the extra [CAMERA] organization is necessary. You could even take things a step further importing the exports into Apple Photos so you’d have backed up copies in iCloud.

Speaking of backups…

Yes! Backups.

As mentioned above, photography is just a hobby for me so I have a relaxed solution to backups. Given that, I’ll highlight two things:

  • I do all of this file organization on my MacBook’s native SSD drive. When the drive starts filling up, I will offload several entire [YEAR] folders onto external SSD drives, freeing up my MacBook’s drive storage.
  • I’ve been a customer of Backblaze for many years, and I rely on it. I use a CalDigit hub that connects all of my external SSDs through a single thunderbolt cable, and I include those as part of my backups in the Backblaze config.

This isn’t a fool-proof system by any means, but it satisfies my personal tolerance for risk of data loss.

Professional Workflow

I’m not a professional photographer, but I can anticipate how I might do things a little differently if I were. For that advice, I’ll inject what-would-be additional steps into the “Personal Workflow”.

PREREQUISITES: A couple of things I’d recommend first and foremost:

  • I would shoot with a camera that had dual card slots, and I would dedicate one slot as file backup.
  • I would store files on external SSD drives instead of your computer’s drive. I would have equivalent drives: one to work off of and one purely as a backup.

STEP 0: Connect both external SSD drives. “Drive A” will be the working drive, “Drive B” will be the backup.

STEP 1 (modified): Create the necessary [MONTH].[DAY] folders in the Captures and Photos directories, but add suffix descriptions to the folder to identify the type of shoot and the client.

Instead of 01.24 you might have 01.24_Wedding-Smith or 01.24_Fashion-Jones, for example.

STEP 3a: Once everything is copied off of the SD card and into the Captures folder on Drive A, do an additional copy of that entire folder onto Drive B. Now you instantly have 2 copies of the files.

BONUS: If you use Capture One for post-processing, I would consider using its session-based catalogs instead of keeping all photos in a single catalog. This has many advantages for client-based photography, but I’ll leave that research up to you.

Conclusion

It’s been over five years since I’ve used some other means of file organization — this approach has served me well. I’m certain there are ways I could improve, but for me and my needs, it strikes a good balance of cost, risk, and convenience.

Hopefully this was helpful, and good luck :-)

Trailer for a video series by Joel Meyerowitz

I’m only one episode deep into this series, but I can already tell it’ll be good. Ever since I picked up Cape Light (my first Joel Meyerowitz book) I was a fan.